Friday, November 30, 2012

Stryofoam trees

Another fun Christmas decoration project to share today.
I have seen all types of variations of these crazy styrofoam trees all over the internet, pinterest, pamphlets at craft stores, etc and decided I wanted din on the madness. Of course, on the cheap.
So I went to the Dollar Tree to pick up my foam cones- I grabbed 3. In order to make various heights, I actually used a base made to arrange flowers that lined up pretty well with the diameter at the bottom of the cone and hot glued them together to get an extra 2 inches. I also used some candlesticks to help give more height to my larger cone and one of the others. Of course, I failed at life and didn't take pictures as I went because I was just SO excited to be making them (lame-o mclamerson). But either way, once I had my larger cone and the two others unwrapped and ready to go, I used little dabs of hot glue to hold the top piece in place and then wrapped them in ribbon. My biggest tip for this project is that if you are going to use ribbon, get the kind with WIRE. I say this because otherwise there were awkard gaps between the ribbon and cone. Having the wire allowed me to PINCH the extra pieces and give some added interest and texture... HOORAY!!

Ok, I am done babbling, now time to share (maybe I will make more in the future and do a better job and photo documenting)


I also feel like I need to make two alterations- something on the base of them- maybe a different color ribbon to give a more finished look?? And the second would be to add something to the top.  I still have a little time before Christmas so maybe I will toy with some ideas.

I really love the jazzy looking red guy. It was a little more difficult with being more transparent so I had to overlap it a little bit more, but I just love how blingy it is.  The other two are great because they sparkle, but bling is bling and it is fun!

Anyone else toy with these trees?? I would love if you'd link in the comments so I can check them out.

partying today @
five days five ways </P>
<P></P>
<P>feature friday free for allOne Artsy MamaShanty 2 Chic

Thursday, November 29, 2012

Mom's Mini Christmas Tree


If there is one thing I love about being crafty, it is inspiring someone else. In this instance, it was my mom. She bought this fun little tree at a craft show of some sort for something ridiculous like $3. She had seen some others "dressed up" with lots of buttons and decided to do something similar. So here is the barebones tree with nothing but these awesome primitive-style lights.


I have probably mention this before, but I have a TON and I mean TON (life time worth maybe) of buttons. Because I am so blessed, I brought a large jar to my mom's house and allowed her to pick as many as she wanted ot decorate her cute little tree. We sat for quite a while for her to do this and when she had all her buttons, I sadly had to go home, but the next week got to see what an awesome job she did. She did pick up some additional snowflake buttons that I think really added to the tree. So overall, super inexpensive craft project!! (by the way, it was the trip that she went to get the snowflake buttons that she/we became obsessed with the idea of the burlap wreaths!!

 Didn't it turn out so great?? I forgot, she also added some fun "ribbon" from Michael's that looks just like tinsel garland... cool, right?

 This "star" at the top is super awesome. I remember seeing this when I first looked through some of the buttons and hoped that it would some day find a really cool use. And I think using it as this was probably the greatest idea ever. If you ask me, I got really lucky in the craftiness gene pool lottery. My mom is also one crafty lady when she finds something to work on.

 Aren't the snowflakes totally awesome too? And you can really see the fun garland. She initially was going to hot glue the buttons but I suggested wiring in case she wanted to change the location or color scheme of the buttons. She thought I was crazy and told me once she got the buttons on she wasn't taking them off, but liked the idea of wiring anyway.

This picture was one I just had to take because of the gold ring.  My mom kept finding these things floating around with the buttons and just thought they were so cool! They turned out to be outer edges of some pretty big buttons from back in the day that just fell off. Either way she thought they were great and hung them as well.

I hope you enjoyed my mom's fun button tree project- I know I just adore it and wish I had one for my house!!! I do have a small tree so it may get a little facelift this year, we will see what time allows.

What unique things do you decorate your tree (big or small) with??


Wednesday, November 28, 2012

Welcoming the holidays

Hi everyone and happy Wednesday (where is the week going?!?)

As I stated yesterday I have been pretty busy crafting and making holiday items (decorations) and gifts for my family. Today I am going to share (excitedly) something I never thought in my wildest dreams, I would be making. As you can see if you have been watching my blog, I have been quite obsessed with anything burlap. While going into Joann Fabrics for items for a project of her own (will be shared at a later date), my mother saw a burlap WREATH on the front of a magazine and had to share with me. I liked the idea of having an actual wreath for the holidays instead of a wooden candy cane/star combo I have been using, but really no desire to take the time to make one. Being the good mother she is, she searched the internet and found a great tutorial at Top this Top that. And
 then of course she emails it to me at which point I checked them out and still thought COOL, but don't think I have the time or feel like it.

Last weekend, I was in my hometown for breakfast with my high school girlfriends and then dropped of a few wine bottle lights (also to be shared soon) a friend's mother had "ordered" from me. I stopped by to visit my parents for a little and ended up going to Michael's for elastic. Well, we all know how that goes. It's like TARGET- you go in for toilet paper and come out having spent $50 or more on who knows what. Well basically, my mom decided she would by items for her wreath which she was going to make for a housewarming gift. The crafter in me screamed out that I needed to make one too (thanks mom!!!) and so I quickly snagged up my materials as well. (in addition to some ribbon for another project and a bow for this one).

Well enough jibber jabber, let me show you the goods!

 Isn't it beautiful? I posted on facebook and it got a lot of attention from friends and family which of course made my little crafter heart SING!!

 I initially made it without the fun acorn decoration and then redid it once my sister texted me on Monday with a picture of them while on her own craft exploration at Michaels. I knew I had to have a few to add a little extra something.


Needless to say, I showed a picture of my wreath to a coworker while it was still plain with JUST the bows on it and she immediately wanted me to make one for her to buy from me. So I kept hers plain jane and her it is.

Not quite as tightly put together as my end product because this is what mine looked like when I showed her the pictures. Still really fun and able to be customized for any season.

Now, go make yours, you know you want to!! :)

Linking up @
We are that family
Life on Lakeshore Drivemop it up mondays Happy Go Lucky Songbird

Tuesday, November 27, 2012

Time warp!!

Sorry friends, no project pictures today, but just wanted to pop in and say HI and I hope everyone had a great Thanksgiving. Although my BIL didn't get to join us at the table for dinner because Cracker Barrel got slammed- we know work as a GM is never ending some day's; but we did have a nice day. Got to take a walk to the playground at the school where my oldest nephew attends and let him and the middle one play for a good bit before dinner. Those two just kill me.
After dinner, my sister and I prepared (and hubby and dad separately) for our Black Friday night out. We were a little thrown Thursday morning when we realized Target opened at 9:00pm and adjusted our schedule accordingly. All in all, we got to Target about 9:30pm and were done at Old Navy around 4am and returned back to the homestead at 4:30am. Just in time to see my BIL as he was getting ready for work opening the store. Needless to say, hubby and I also had to work Friday and given that we were over 2 hours from home, we slept until about 8am and then hit the road. We made it back in town around 11am and we both got changed and headed back out the door!
Saturday morning was spent scouring my local Joann Fabrics because they were having awesome sales on some items I desperately needed discounts on for Christmas presents such as polyfil and some mason jars.  I also hit up, Dollar tree right next door to pick up few little items such as the short strands of lights which fit rather perfectly in wine bottles (I will post this project very soon).  Later in the day we also went to Michaels across town because my Xyron Create a Sticker refill seemed a little too pricey at Joann's. Needless to say I walked out with that as well as a bunch of Herma Dotto Refills as this is my super duper fave adhesive to use. With the holidays and plethora of projects on my list, I know I will be needing these. I again ended up at Michaels Sunday because I needed a different size/type of elastic for a headband I made for someone at work. Ended up leaving there with supplies for a wreath like one my mom showed me she wanted to make as a housewarming gift for a friend at work. BUGGER. I saw how inexpensive the supplies were and decided I'd surely make one to (pictures forthcoming as well).

So while I don't have any pictures to share today, I have been busy craft shopping and craft-making- oh boy!! I cannot wait to share all my projects with you all. I think tonight I work on drafting all the posts so they are ready to go each day. So many projects to make, so little time to document and share.

Happy holiday crafting crafty friends :)

Tuesday, November 20, 2012

Beaded Bracelet

I didn't think I would get to post ANYTHING today because it is such a busy day and I have so many projects in flux with the upcoming holiday season- BUT here I am anyway. Just finished up some bracelets that I found at HonestyWTF (complete with tutorial) after a coworker requested some handmade gifts for her teenage sister.  I gave her a few options and this is what she chose:


I have never really done much jewelry making beyong hemp bracelets back in the day so this posed a challenge!! She likes these the best so I went with it. Now, I couldnt' find the waxed linen cord but found these fun colors of some type of craft string and they were a great price (4.99 + 40% off coupon) so I couldn't pass them up. As a result, my string was a little thicker and I had to use 6/0 Czech Glass beads which were prettier than the original ones I has chosen. 


Once again I dipped into the awesome stash of inherited buttons and did 3 different types of buttons on 2 bracelets each. I like how they turned out. I would have loved them to be thinner like the original but she is happy with them, so that is all that matters :)  Hope everyone is having a great day!

Monday, November 19, 2012

Home-made housewarming/ TUTORIAL!

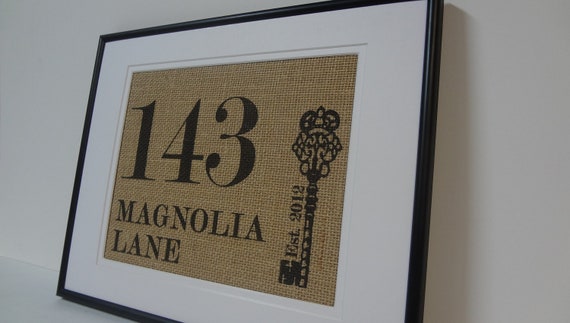
Hello everyone, hope you all had a fantastic weekend. As usual, mine was entirely too fast and I didnt get everything accomplished that I had hoped. On the bright side, Friday evening I got to make an idea come to life and it turned out GREAT! On a week's notice of a friends open house and not really having much moola or time to shop I thought I'd start looking for ideas that I could make my own. I really liked this cool idea I found on Burlapartbyelizabeth on Etsy.
Personalized Housewarming, Engagement, Wedding or Anniversary gift

And thought, hmmmm.. wonder how I can make one of those. I came across a basic tutorial for a monogram burlap at My Love of Style. So I took what I needed and a great idea from a coworker to use my Cricut to stencil my smaller letters and was off running.

1.  I started by cutting my burlap to the size of my glass.
2. I outlined the numbers and the key as seen below on my computer print out and then lined up my cricut-made "stencils" for the address portion. One helpful hint is that if you cannot see ALL of your design through the bulap, you can re-outline with sharpie- it helps SO MUCH!!


3. So next I patined in the numbers, key and stencil and then peeled up the stencil to reveal a fun looking letter!

I just loved it!! Then I remembered.. oh yea- I wanted to put the YEAR so they will always remember what year they bought their new house.

4. I cut out and put on a 2012 "stencil" and added some paint.

5. So here is a picture of everything completed , but when I tested how it looked in the frame, it needed a little more.


6. Since my piece really could benefit from a "mat" I cut a piece of 8x10 shimmery white cardstock into a 1/2" mat using a papercutter and just being REALLY careful. (sorry about the orientation of this picture- not really sure WHY, but blogger keeps flipping it when uploaded and I don't know what else to do for it. ) I did also use some spray adhesive on the mat to keep it stuck to the burlap


 7. Last but not least I placed it in the freshley painted frame I already had on hand and WALA! I included my original computer printout of the original idea I had some up with.. I think it turned out pretty darn great :)


Have you ever tried burlap creations? If so, what have you done?  I am addicted!!

Linking @

mop it up mondays feature

Friday, November 16, 2012

Banners, Blocks, and Blessings

I hope everyone is checking off things on their pre-Thanksgiving to-do list and still having some fun with crafting and decorating. I thought I would share the Thank
sgiving banner previously posted now that it is in its *rightful* place.


I really love how it turned out and guests to the house loved it, too! I made another one that I sent with my sister and a mini version for work. The letters and leaves we're cut from the cricut and the tags were cut with the Fiskars cutting system from way back when before I had a cricut... those older tools do come in handy at times. And on to the next piece of Thanksgiving goodness. I saw this awesome little project at Two Yellow Birds Decor and decoded I absolutely needed to male my own so I did!
They are very randomly sized mostly because these wood pieces were literally scrap and I left then whatever size they were. I painted them while a pizza was in the oven. While they were drying I toyed with letter and word sizing so once the buildings were dry, a little adhesive and they were ready to go! Now onto my last really easy little project. And by easy I mean EASY.
The big secret? All this is is a piece of cardstock, some scrap burlap and a sheet of stickers fromTarget dollar bins a year or so ago... And wala! Kinda cheating, huh? There are so many attractive subway art free printables, but or color printer is nugget and no time to get somewhere to print it... But love it anyway. Happy Friday! Going to link up a few places later but for now its shower and having to the bank before work. Have a great weekend :)


*ADDED* Linking up today @

 One Artsy Mama Blue Skies Ahead

Wednesday, November 14, 2012

I *LOVE* jars!

Hi everyone!!! I haven't had a ton of time to complete projects so far this week, or even post on the things I have been working on, but I have a few minutes and some photos I took on my phone so I thought'd I'd do a quick share.
After my sister was at my house, she made the request of a jar to hang in her bathroom like I did. (Sorry, I don't have a picture- will add later!!) I reminded her how simple it would be for her to create her own, but she would rather recieve it from me. That being said, I was headed to Joann Fabrics yesterday anyway and saw the cute little mason jars and grabbed a few. I had been meaning to try out the whole lotion/soap dispenser thing anyway.  So last night at something like 10:00pm I whip out the needle nose pliers and one of those hole starter things. (no pictures of the steps either because I was winging it based off a few things I saw browsing online.)
So here is the 1st finished product.
And I say 1st finished product because I was so super excited that it worked out like it was supposed to that I very nicely placed it in my kitchen and thought that this would be perfectly sufficient. I went upstairs and began to work on something else when I remembered I had braided some old tshirt fabric and soaked in tea, oh about a month ago, and the strips were still hanging in my craft room waiting to be made into flowers. I got to thinking how cute it would be on the jar and with a little plaid ribbon and a button.

Enter real finished product with fun effect on my cell phone camera. I do have ACTUAL camera pictures too, just not available now and I really felt the need to post since it has been a few days and I am just ticked with this finished product.

Might be doing a few of these for gifts this year- in addition to the ever growing other things on my "to make" gift list!! Have fun :)

Tuesday, November 13, 2012

My first guest post!!

Hi everyone, today I am guest poster over at Shaken Together and I could not be more thrilled :)
She is featuring someone new each Tuesday this month and some of December with some awesome handmade gift giving ideas.

I will hopefully be back tomorrow with the promised thanksgiving blocks and some other fun ideas.

Saturday, November 10, 2012

Slow week

I don't know about anyone else but this week has not been a good one for completing my craft to do list. I tried a few things that didn't work out and am still in the working phases of lots more. Either way I do have a second Thanksgiving banner to share. The first was just to understated for where it was hanging and after making letters for my crafty neighbor, I was even more unsatisfied. So today I present to you, more banners!
The first picture includes one for me and one for my sister. The second is mini that I hung on the outside of my cubicle at work. Got lots of compliments on the overall look but specifically the "rustic" colors. I hope everyone else is having fun prepping for there holidays. By the looks on pinterest and sites I follow, you are! Have a great weekend and maybe I will be back with another post later... * crosses fingers *