Tuesday, June 25, 2013

Summer centerpiece

Over the weekend, I got a little time to catch up with an old coworker of mine. It is always so funny to me how well we get along because she is old enough to be my mother and has grown kids my age. She was a therapist where I used to work as a case manager and we had a common kiddo or two. We have kept in touch since she left and meet up occasionally for coffee at one of our favorite spots- WEGMANS!!!  Not this time though.

She had messaged me a few weeks ago that she was cleaning out her basement and had found some of the old blue ball jars.  She immediately thought of me and my crafty ways and thought I could use them. She was definitely right


We were busy the rest of the day Saturday, but when we got home I couldn't help myself but to set up a nice little centerpiece on our table. Took just a few seconds and  LOVE it all lit up


Aren't they so pretty? Pretty perfect to sit and look at in the evenings with all the lights off.

Do you have any fun summer decor that you use mason jars for??

Friday, June 21, 2013

Goodwill Plates to Garden Stakes


I have seen this idea a few times online via pinterest and blogs I follow (which of course I couldn’t find again to show my husband) so I am not claiming this as my own original idea. However, I do have to say I fell in love with the idea and knew immediately that my dad, king of lawn ornaments, lover of all things outdoorsy was going to get some version of these for Father’s day this year.  

I started out with some kind of neat but boring clear glass plates and coasters (?) plus a little yellow/amber colored piece.   


I wiped them down and got to work. I hit up the mancave basement for some leftover cans of spray paint and found red and green which went perfectly with the paint I picked up for Treasures from the Trash  project from Valspar.


After the paint was dried, I covered them with a clear coat and let that dry as well. The clear coat helps to seal the paint and keep it from being sticky/tacky.

From there, I glued the pieces together using Epoxy (because my husband tells me that hot glue is not REAL glue.. Crashed my world.) I must admit it did work very well and I am rather impressed.
After the plates were glued and set (I left them for 24 hours) I glued on the nut, let it set for about an hour and then spun them on to my stakes.

Because the plates dip in the center, it was a little hard to find a good place for the nut to sit and ideally, I suppose I should have put one at the top and bottom, but I only bout a two pack. 

Anyway, I am happy with how they came out and hope my dad likes them!! I made them for his father's day gift, which he will finally receive tomorrow since I worked all last weekend. 

Then I might have had a little bit of fun taking pictures... hah, shocking I bet.


Awesome right?!?!?

Wednesday, June 19, 2013

Treasures from the Trash


I think all of us crafters love the joy of taken old, abandoned items and turning them into our little treasures. Well I am no different, my friends.  In fact, in this recent project I literally refurbished items that were in someone’s pile waiting for the beloved trash man to pick up.

A few years ago, my friend introduced me to a local program call Free-cycle. They have them in different areas around here and I belong to 2 or 3 separate ones. In one of them, there is a lady who goes into nearby “rich” neighborhoods and checks out their trash piles a few times each week. Not something I have time to do but it is totally awesome that she did. The awesome part is that she then sends out an email through Freecycle with the list of all the goods. People respond to her with what they want and when they can get it. I have traveled to her home at least 3 times so far to pick up goodies.

Imagine my excitement when I saw that she had some planter boxes up for grabs and I was granted them!! I was even more excited when I arrived that they were the longer ones- closer to about 2 feet each. Were they perfect? No. Did they need cleaning? Sure did!


Before I even cleaned them up, I knew I was going to paint them. With one being green and one tan, plus all the other dollar tree planters I had bought being tan, I wanted to make these POP a little bit.  While at Lowe’s for another project I found Valspar All Weather Spray Paint in a gorgeous blue/turquoise color. I used this paint for my other project as well which I will share soon too, promise.
So one Sunday afternoon, I busted out the hose and some soap and a sponge to clean up these bad boys before spraying them.

They didn’t become totally clean, but definitely less dirt filled and ready to be painted once the water dried up. From there, I took them out back and took turns spraying different sides and all that until I was satisfied then let them out to dry while we headed to a family function.
Two days later, I filled them with wonderful plants I bought from Lowe’s- some on clearance for as low as 50 cents and others I paid $1.88 for. Overall, I paid about $10-15 for plants and the spray paint (outside of the $4 I spent on my other planters from the Dollar Tree).

The best shot I could get of the whole area

the little planters from down below, from Dollar Tree!!


My little steps... my 2 y.o nephew helped me put a little fake flower in the little girls bucket (no flowers successfully grow in there..they fry up!!

$6 Dollar General pot from 5 years ago.. looking a lot better

part of the side garden

a better view of the side garden .. back behind the lillies are growing tomatoes (or so I hope!) 


So the moral of the story is... I now have a little haven of pretty that I can look out at and it makes me so happy. On cool nights, I like to open the door and plug in some outdoor lights and enjoy the summer evening.


Do you have a spot in your garden or yard that just makes your heart smile?

Thursday, June 6, 2013

Inspiration Thursday #11

Here we are again on another Thursday. Sometimes weeks can kick us all in the pants, can't they? I hope the little inspirational pics/quotes I have picked today can give you a little pick me up, if you are in need. And if not, maybe something to save for a rainy day when you need them!!


via


via (isn't that the truth??)


via (so true.)


via (stay strong even when it is hard)

Inspirational Quotes About Happiness
via (choose HAPPY!!)

Happy almost weekend :)

Wednesday, June 5, 2013

DIY Cardboard Letter

Here I am with the second of the two DIY gifts I gave to my nephew for his 6th birthday. (don't worry he got things he can play with and read too!)

This idea was actually something I saw on Pinterest back quite a while ago here and it seemed like a genius idea. Taking nothing but cardboard, dixie cups, and some hot glue and turning it into those awesome 3D letters. 


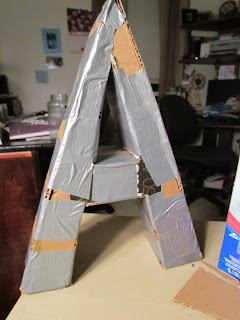
I started out with just that- cardboard, cups, hot glue plus some mod podge and paper, oh yea and duct tape. Going to go out on a limb and show you the fail that then led to this win. Sorry in advance for the dark photos. I didn't have a ton of time to mess with everything when I was doing this project, but wanted to document the how-to along the way. 

 I don't have a picture of me cutting out the A's, I feel like it would have been pretty pathetic. Just sayin. Anyway, once the A's were cut, I began to glue cups to the "wrong" side of one.

I really had to get creative and mold/manipulate cups as the letter got more narrow and the whole cup wouldn't fit. Just do whatever you need to to make it work :)


Just a weird side view once both sides were glued to the cups. This is harder than it looks. I mean it is easy, but definitely not as easy as you'd think. Again, manipulate, whatever/however you need to to get them mostly lined up. 

"birds-eye view??" Ok, I tried. 

The next biggest part was filling in the sides and inner parts with more cardboard so the cup portions weren't just open. Next I tried to mod podge scrapbook paper onto the A and make it all cutesy and stuff. I say try because....


I could have potentially made this work, but lets face it. I didn't have a ton of time and my letter was bigger than 12x12 scrapbook paper could accommodate which is just more evidence that I am spatially STUPID  impaired. After my fail, I went to the fun Five Below and picked up these rockin rolls of duct tape.


Which I meticulously (seriously...) wrapped around this cardboard shape. I didn't time myself but it felt like it took forever and a day. Again, lack of spatial thinking. 


Either way, there you have it. 


Now, you can tie ribbon through and use a hook to put on the child's door. My sister happens to be moving in the next few months, so we will do that at the new house!!


Monday, June 3, 2013

My $1 Stache Jar

A few weeks ago my sister sent me a picture of a ‘stache jar which I had actually pinned months back. She told me she had shown it to her oldest son and he loved it. She wondered if I had anything that we could use to make him one. Really? Of course I do. I hoard spaghetti jars these days because I use them for everything. The only thing I actually bought for this project was the mustaches.


I found them at.. where else.. the Dollar Tree!! They were in the kids toy section and I initially thought they were felt, but was happily surprised that they were actually FURRY! It is really the little things.
So anyway, after I got the jar all cleaned up, I cut my letters out using my Cricut, put some dear old matte mod-podge on it, slapped the letters on and modpodged over-top.


I also applied modge all over the jar to give in a fun look to it. After it was completely dried I put the ‘stache on. (please ignore the disaster in the background lol.. always a mess when projects are in progress.)


For the lid, I made a small slit (to slide moola through) turned it over to apply some hot glue to the raw metal to avoid injuries, and the spray painted it.
And there you have it, a personalized 'stache jar.

He is already having fun adding money to his jar to save up for something awesome.